How to send emails from static websites

While there are many 3rd parts solutions to this problem, none of these really work the way I need. Today I’ve decided to write a complete step-by-step guide to solve this issue once for all 🎉
Background
There’s a plethora of free or paid “form services” out there, including SendGrid, Mailgun, Pepipost, or even Jumprock, which I’ve used myself for a little while, but most of these services don’t work well with fetch or XMLHttpRequest due CORS related issues, so that you’ll find yourself submitting emails via HTML forms, eventually redirecting your users to the previous page after.
This is more than OK, if you live in the 90’s, but in the SPA and PWA era, these are easily obsolete, or even useless, as you don’t have full control of the submitted email lifecycle, hence you cannot keep your page state as it is due redirects.
In this scenario, where even hidden iframes as post target wouldn’t work, our Service Worker will also have hard time handling email requests.
Since I am not that kind of person that accepts ugly compromises in the programming field, I’ve found myself an easy and cheap solution to keep my websites both static and capable of sending me simple emails, through tiny utilities, that do one thing, and (hopefully 😅) do it well.
I initially planned to create such service myself and offer fair plans for everyone, but the emailing landscape is complicated, and full of hidden caveats, so that once I’ve found the solution for my needs, I’ve decided to help everyone else with similar needs through this post.
The Services I Like and Use
I am sure there are various alternatives out there able to provide similar results, but the services I’ve used and love the most are the following one:
- iwantmyname is the domains registration and handling service I’ve been using for dunno how many years. It’s deadly simple to use, it gives you no headache whenever you want to stop renewing a domain, and not only it has very fair prices for a variety of domains, it also offers everything you need to configure third parts DNS handlers or services.
- GitHub or GitLab are the no-brainer repositories to use, in order to track all your changes, rollback, publish via hooks, and so on and so forth. These both allow you to publish static websites for free, and these both offer private repositories to keep your “mess” secret, but here we’ll use all the necessary precautions to likely never need a private repository. Bear in mind, if you don’t even need to send emails from your static site, iwantmyname has great documentation to easily point any domain at your static GitLab/Hub repository, so that this is already a wonderful solution that costs zero. Add Cloudflare to this mix, and your static site will also have HTTPS for free.
- zeit now v2 is the easiest way to publish any static website for free, also providing easy serverless functions to go beyond static. Your site can indeed scale at any time, but to start publishing all you need is a
public/folder with all the static assets you want, and thenowCLI to publish these assets live. I personally don’t care much about all the frameworks it offers out of the box, since heresy-ssr is not one of these 😜, but that’s surely another plus to this platform you should investigate a bit more about. Zeit now also scales through its payed plans, and it doesn’t really lock you in, making it a win for most common use cases. - Amazon Simple Email Service (SES) is apparently the cheapest email provider on the Web, so that even if your site has a huge volume of emails, you can switch to a payed plan at any time, and go beyond any initial free plan boundary. Truth to be told, I’m not too fond of Amazon non existent sustainable policies, and if there was anything similarly cheap but green, I’d switch immediately to that service instead, and this is true for every other SaaS I use, or suggest, daily.
⚠ About Security
Before going any further, I’d like to underline most information used to configure anything I’ll talk about should never be exposed.
There are also other things to consider moving forward, so please be sure you’ve read the following security checklist ’til the end:
- credentials should never be published to your repository. If you do this by accident, unless the repository is kept secret forever, and arguably even in such case, delete your repository and start from scratch, remembering to never push anything confidential in there ever again.
- sending an email via JavaScript is exactly the same as sending an email via any webpage form. Yes, some troll could start sending random emails to you, and there’s not much you can do there. However, the techniques described in this post won’t ever allow your website visitors to know the destination email, which is instead a curse for any
<a href="mailto:...">. Accordingly, considering that now takes measures against DoS, and considering that your email is never exposed to visitors, these techniques can be considered better, in terms of undesired spam, thanmailto:links, but also as DoS prone as any other live form. - If you flag emails you receive from your own sites as spam, you’re responsible for your own email issues and site reputation. Just don’t!
- even if the proposed JS library uses every possible defensive technique to avoid 3rd parts scripts interfering with its logic, it’s recommended to use modules and bundlers to import it, or store such variable in a private scope, as shown later on, so that it won’t be easily reached via console. This might help reducing troll attacks.
- if you have secured the JS library, but you don’t want every robot on this planet to spam your email with unnecessary crap, you can register reCAPTCHA for your site, as documented later on, or any similar solution, and send emails only after successful results. This won’t necessarily protect you from DoS attacks, but it’ll surely filter the majority of robots that will try to submit any form they find on the internet.
- last, but not least, I’ve chosen the name
/api/paperboyin my examples to keep it simple and self-explanatory, but you should better name your serverless function files using something less predictable like the output produced vianpx uuidcommand line, so that it’s not by just hitting/api/paperboythat one triggers emails
Keeping all these points in mind, we’re now ready to configure our website 👍
The Software You Need
Everything explained in this post assumes you have the following software installed and usable via console/terminal:
You don’t technically need an editor to work with the project, but of course anyone you like would likely be helpful.
Get Your Domain
Registering a domain not only makes your static site easy to reach via URL, but it also makes it suitable for most services out there, including emails or reCAPTCHA. Zeit now also offers an easy interface to configure it, as long as you can change the domain DNS so that it won’t be anymore your domain service handling these, but zeit now instead.
For simplicity sake, I’ll talk about the static.email or your.site domain in this post, but every time I mention one of these I mean the domain you bought.
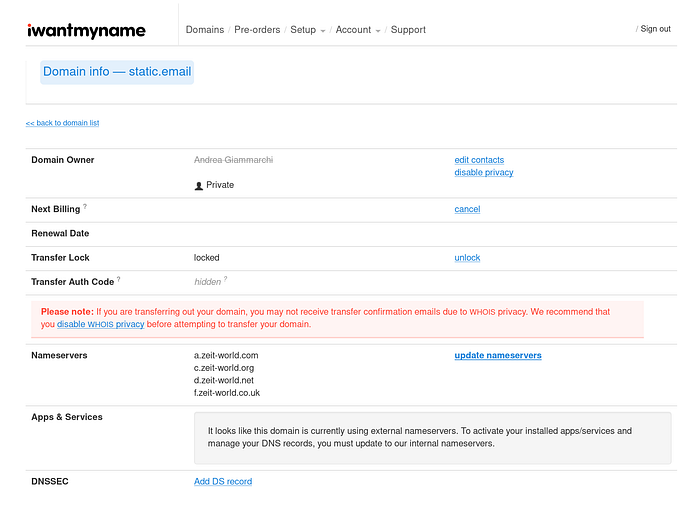
As previously mentioned, the most important thing a domain register service should offer, is the ability to change or update nameservers, so that you can later on put those provided by your hosting service, in this case zeit now.
A domain has a cost that goes from reasonably low to extremely high, but this doesn’t depend on the service you use, it’s rather the business behind such domain that makes the price.
On average, you can have pretty good domains for something like $12 per year, which shouldn’t be a big deal for both hobbyist and professionals.
Create Your Git Based Project
You can either create an empty repository via GitHub or GitLab, and then clone it locally, or simply create a folder named after the domain you have bought, and type the following once you enter into such folder.
git initAt this point you are setup to commit changes to your static website, with meaningful logs and the ability to rollback at any time.
The First Project File
Since security should be our major concern regarding anything that ends up online, the very first file we should create in our domain folder is a .gitignore with at least the following content:
node_modules/
.env
I usually add package-lock.json file too in such list, to avoid sharing its content with my future self, or others contributing to the project.
Please note the file name must be exactly .gitignore, being gitignore “the extension” of a nameless file.
The package.json
You can either type npm init -y in the domain folder, or simply copy and paste the following content into package.json file.
{
  "private": true,
  "scripts": {
    "local": "http-server ./public"
  },
  "devDependencies": {
    "http-server": "^0.11.1"
  },
  "dependencies": {
    "dotenv": "^8.1.0",
    "static.email.ses": "^0.1.3"
  }
}
You should then type npm i to install regular and dev dependencies, which would create a node_modules folders, already ignored by the repository.
The public folder
Typing npm run local in this folder would spin a local server to test your static site, but it expects to find a ./public/ folder with some content.
For this demo sake, we’ll create a folder that also contains a css and a js folder where we’ll put some file later on.
mkdir -p public/{css,js}If you are on Windows, and without a Bash shell, use your mouse or any other command you know to create public with also public/css and public/js folders inside.
The index.html
To be able to test our most basic static site, with the ability to later on send emails, create an index.html file inside the public folder.
This index contains the following external dependencies:
- the main CSS file to style the content of the page
- the
static.emailJS helper, used to send ourselves emails - the main JS file used to bootstrap the form or anything else
The CSS
I’ve used the following content for my public/css/index.css file:
The JS
As mentioned in the security paragraph, and since I am not using modules or bundlers at this time to keep it simple, when we include the StaticEmail library as global variable, we should try to avoid keep leaking it on the global scope. The following code, which should be saved in public/js/index.js, will also instrument the page form to be able to send emails on submit.
The local server demo
If we have done everything right, we should be able to reach http://localhost:8080/ after typing the following:
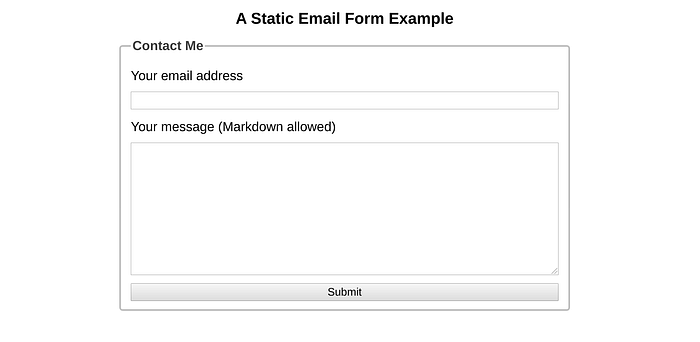
npm run localThe resulting page should look somehow similar to this one:
To stop running the server at any time, use the Ctrl+c combination, or Command+c if you are on a mac.
You Can Test The Form!
The static.email utility would fail if the server didn’t reply with a status 200.
However, most common errors are passed through as message, so that we can figure out if the server, like the one created via http-server, is incapable of dealing with posted data, returning a 405 instead of 200.
After all, a static website is usually never able to accept posted data, but since the server would return a very specific error message, the code can deal with it and decide to fake a success, a failure, or both, as it is for the example code.
function (error) {
  // this check is to make code testable via http-server
  if (
    error.message === 'Method Not Allowed'
    // handle 405 errors as either OK (75%) or errors
    // if you don't want errors, comment the following line
    && Math.random() < .75
  )
    thanks();
  else {
    alert(error);
    contact.submit.disabled = false;
  }
}
Feel free to comment out the && Math.random() < .75 line, within the public/js/index.js file, if you want to always see a successful submit, or change the code to better deal with possible failures, as these can always happen in the real world.
Once you have filled up both fields, you should see a feedback like:

Your First Commit
Since we already have all the basics to start developing our static site, it might be a good time to commit everything we’ve done so far, so that we can eventually rollback in case we fail at others incremental changes.
git add .
git commit -m 'basic static site ready'
You can always read the history of commits by typing git log .
Go Live With Zeit Now
The zeit.co now service is both easy to use and it has extremely competitive prices, starting from the free plan that allows 5000 requests per day to any serverless function, offering unlimited bandwidth for assets served via CDN.
Our public folder is where these assets are found, and 5000 requests per day should be more than enough for any small to medium business.
But fear not, starting from $0.99 per month you can easily scale up, so that instead of buying a packet of cigarette, where in UK it’s up to £12.5 each, you can “smoke other businesses” for the same price spent over a whole year.
Now Login
If you aren’t already using now daily, you can start now by following their “getting started” documentation page, or simply typing the following:
npm i -g now
now login
The login will likely ask your email address, which could be anyone you use daily such as GMail, Outlook, and others.
For simplicity sake, I’ll use your.name@email.com as alias for your email address, but to properly verify your login your email address must be a valid one, as there will be a counter verification link sent to the address you provide.
Now Go Live
Once you’ve successfully logged in with now, all you need to do, from your domain folder, is to type:
nowThe CLI will copy to your clipboard a reachable URL that will show already your site: feel free to visiti it, as it should basically show exactly the same page you were checking locally, except that the submission of the form will always fail because there is no API available (yet).
This is a good first step to check your now setup works as expected, all we need to do at this point is to point the domain to the current deployment.
Now Use The Domain
If you login through the web interface, and you reach the domains section, you should be able to easily add the bought domain to your project, which is listed by folder name, so that it couldn’t be easier to know which one it is.
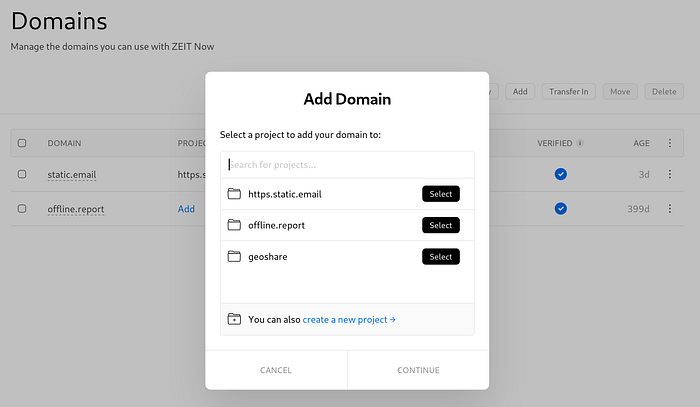
Select your folder, even if the name doesn’t reflect the domain you bought, and click continue to associate the domain you bought to such folder.
You will receive instructions on how to update your DNS values to point at the zeit.world, and once you update these via iwantmyname admin page, it’s just a matter of minutes, if not seconds, before your domain will be reachable.
Now Publish To Production
Once the domain has been configured, all it takes to make it reachable via https://static.email, or whatever domain you bought, is to type this:
now --prodIn a minute or less, you should be able to visit the domain which should still present the same page you’ve seen so far.
Now Add A Serverless Function
Before we can actually send emails for real, we need to create an end point able to accept requests from our site.
mkdir -p apiCreate an api folder inside your domain project, not inside the public one, and put the following content inside api/paperboy.js file:
module.exports = (request, response) => {
  if (request.method === 'POST')
    response.status(200).send('OK');
  else
    response.status(400).send('Bad Request');
};
That’s it, the server is now able to reply to the StaticEmail library with a 200, and it will return a 400 for every request that’s not a post.
This is the most basic functionality we can have, to start testing our serverless function, through the static site we have built so far.
Save the file, and type now --prod again to see it live. At this point, the form should work every single time, unless the site is unreachable due network conditions, and you should read Bad Request if you visit /api/paperboy directly.
If everything works as expected, we’re very close to be able to use the form in a meaningful way. All it’s missing, is a service that would let us send emails via our serverless function.
We could also commit all changes, as we’ve done great so far.
git add .
git commit -m 'the site is "now" live'
Amazon Simple Email Service (SES)
This is likely the most complicated part of our journey, as it involves various security related operations that cannot (unfortunately) compete with the easiness zeit now offered so far.
This is also the time we’ll put content into the .env file, as it’ll be very convenient to reference to it for any present, or future, change.
At the end of this part, such file should look like the following one, with the right information assigned to each variable:
AWS_SES_TO=your.name@email.com
AWS_SES_REGION=your-aws-region
AWS_SES_ACCESS_KEY=your-aws-iam-access-key
AWS_SES_SECRET_KEY=your-aws-iam-secret-key
Remember, the .env file should not be created in the public folder, just on the root of your domain folder, and it will be safely ignored by both git operations, as previously defined through the .gitignore file, but it will also be ignored by now CLI operations … got it? Let’s start!
Create An Account
If you haven’t done this before, you need to sign in to Amazon SES.
Once you’ve done that, log in into your console and look for the Simple Email Service, then go to that section.
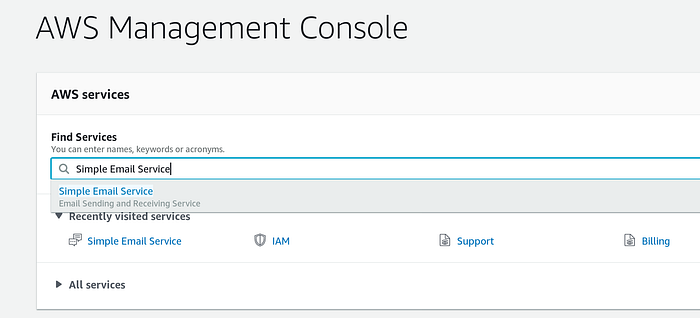
Choose A Region
I am not sure at which point you are asked to pick a region for your services, but any region close to your country should be good enough.
If you don’t find such region, just pick one from the United States, as zeit now servers are likely close to those regions anyway, and deploys can span over multiple regions.
Write down the chosen region in your .env file, after AWS_SES_REGION= entry.
Add Your Domain
Click domains on the left side menu, then Verify a New Domain.
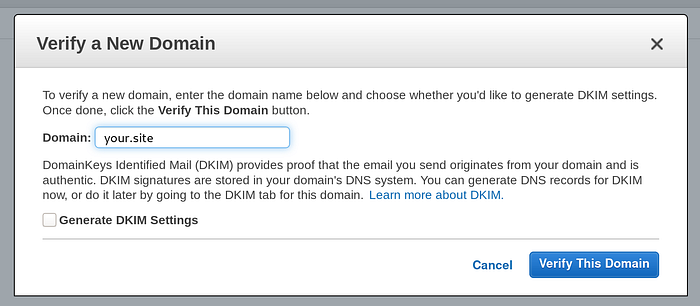
Add The Domain Verification Record Now
The verification is needed so that Amazon SES knows emails coming from xxx@your.site have a known entity behind.
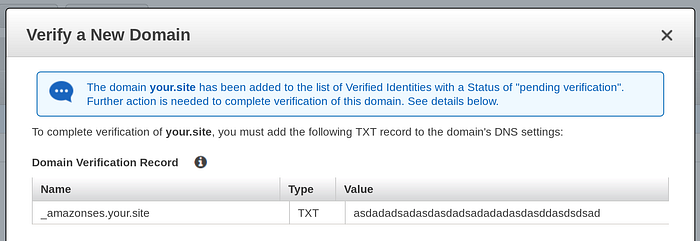
In order to add that Domain Verification Record in zeit now, you need to type the following from your domain folder:
now dns add your.site _amazonses TXT yadaYadayAdayaDayadAwhere your.site is your actual domain, and yadaYadayAdayaDayadA is the actual value Amazon provided.
You can use the same command to eventually add any other key, but these won’t be neither necessary nor covered in this post.
To be able to receive emails to your own address, this needs to be verified.
Verify Your Email Address
The procedure to do so is quite straight forward: you go in the Email Addresses section, and you click Verify a New Email Address button.
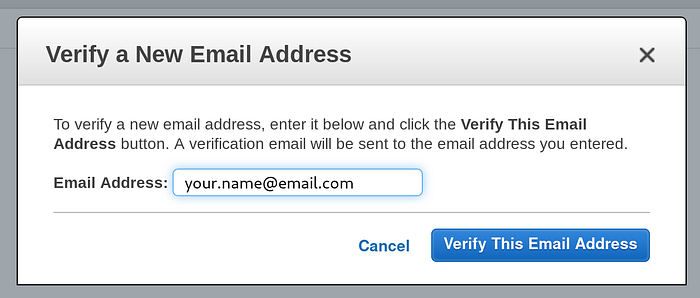
The verification is pretty simple: you’ll receive an email to your.name@email.com address, and you need to counter-verify you received such email.
This should be sufficient to see, next time you check that SES page, that your email has been verified.
Write down your email in your .env file, after AWS_SES_TO= entry.
Identity and Access Management (IAM)
This is the last bit of information you need to validate, this time per each interaction you’ll have from your site to any Amazons SES call.
First of all, you need to reach the right page, where you’ll need to click the Add user button.
You’ll find yourself in a 5 steps modal, and you can simply ignore the third step, as it’s not necessary to setup emails at this point.
Step 1
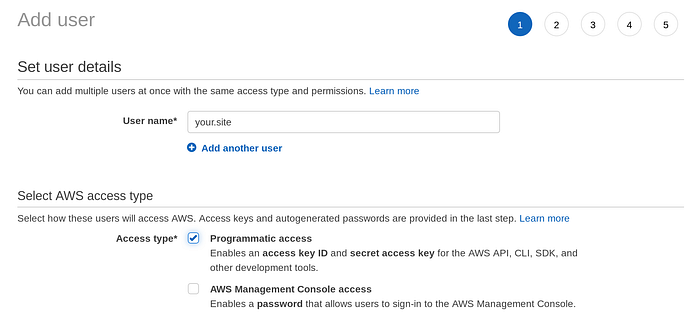
Put any name you like as User name, but to keep things organized, I suggest you type the domain you bought.
Remember to also check the Programmatic access checkbox, as this enables exchanges with your site.
Step 2
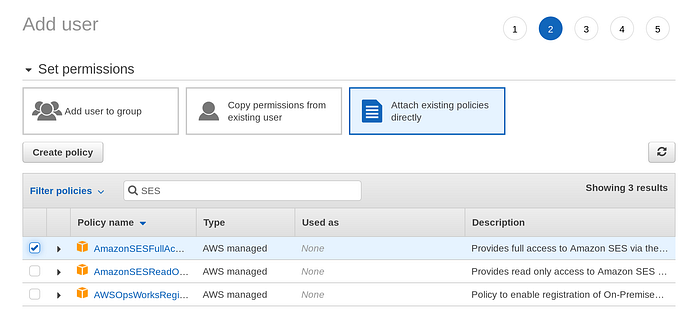
Click on Attach existing policies directly button, and filter policies by typing SES in it. Check full access to Amazon SES to ensure you can send emails, and feel free to ignore the step 3.
Step 4
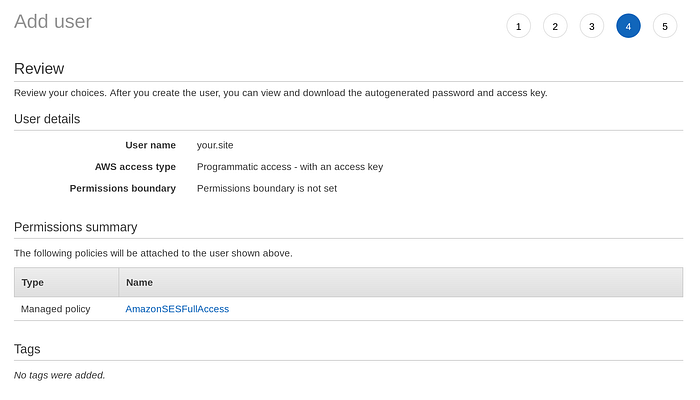
Review your inputs so far, specially the User name and Managed policy.
Step 5
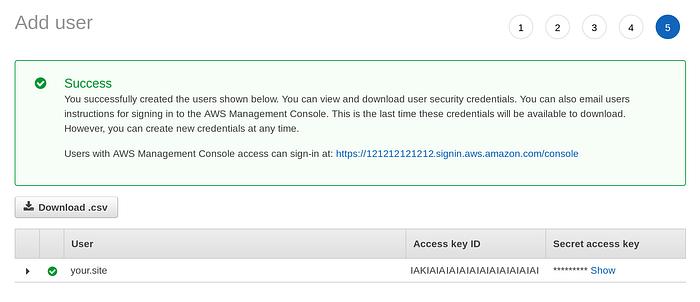
If everything went smoothly, you should read a Success message 🎉
If you look after such message, you will find the values to save in your .env file, namely the Access key ID and the Secret access key.
Write down these two in your .env file, as AWS_SES_ACCESS_KEY= and AWS_SES_SECRET_KEY= entries.
You can finally save the .env file, and get out of Amazon’s console.
Now Add All Secrets
All details needed to communicate with AWS SES Service from zeit now are available, but since now doesn’t push the .env file, we need to use its mechanism to store any secret we’d like to use in production too.
now secrets add aws_ses_to your.name@email.com
now secrets add aws_ses_region your-aws-region
now secrets add aws_ses_access_key your-aws-iam-access-key
now secrets add aws_ses_secret_key your-aws-iam-secret-key
All values must be those you have saved already in the .env file, and once you have added all these secrets, you need to tell now how to retrieve them.
Copy the following JSON content into now.json file, at the root of your site folder:
{
  "env": {
    "AWS_SES_TO": "@aws_ses_to",
    "AWS_SES_REGION": "@aws_ses_region",
    "AWS_SES_ACCESS_KEY": "@aws_ses_access_key",
    "AWS_SES_SECRET_KEY": "@aws_ses_secret_key"
  }
}
These will instrument now to pass along, as environment variables, the secret stored for our now account.
Please note that once you’ve got your first static email working, it’s a better practice to prefix each secret with the site name, so that you can use the same configuration in more than just one site.
Example:
now secrets add your_site_aws_ses_access_key your-aws-iam-access-key
now secrets add your_site_aws_ses_secret_key your-aws-iam-secret-key
In this case, the only file that needs to change per each different site would be the now.json one:
...
"AWS_SES_ACCESS_KEY": "@your_site_aws_ses_access_key",
"AWS_SES_SECRET_KEY": "@your_site_aws_ses_secret_key",
...
You can keep the same region and destination email for all sites though, but at least it should be clear how to eventually change those too, and through the same procedure.
Update The Paperboy 🗞
The api/paperboy.js file is currently useless, if not for testing that serverless functions are up and running, but now that we have all the details we need, we can write down a better code that will use all secrets to make it happen:
// use the .env if present, do nothing otherwise
require('dotenv').config();// the utility to handle StaticEmail requests
const {create} = require('static.email.ses');// secrets revealed via dotenv or now
const {
  AWS_SES_TO: to,
  AWS_SES_REGION: region,
  AWS_SES_ACCESS_KEY: accessKeyId,
  AWS_SES_SECRET_KEY: secretAccessKey
} = process.env;// the serverless function that now will use
module.exports = create({
  site: 'your.site',  // put your domain here
  sender: 'Your Site',// any sender name
  to,
  region,
  accessKeyId,
  secretAccessKey
});
Save above content into api/paperboy.js and type one more time:
now --prodCongratulations 🎈🎉
You can finally visit your site, and see that the form should now work as expected, sending to the secret email address you chose anything you type in the text area.
If that’s the case, you can celebrate your first static website with send emails capability, and call it a day, ’cause you’ve just setup something other people sell, spending so far only money for your own domain, which is something you would’ve spent for anyway, if you were serious about your site.
Feel free to change every part of the website, including the form, as long as you use StaticEmail library sandboxed via modules, bundlers, or closure.
… just one more thing …
Now Use reCAPTCHA
While zeit now grants 5000 requests per day to our serverless functions, Amazon SES gives us, on a free plan, a limit of 200 emails per day.
I’ve never personally received 200 emails per day, but since the ratio here is 25:1, we should probably do something to avoid at all costs undesired requests, like those spam robots do when they find any form only, or trolls that have nothing to do than writing crap on our forms.
And even if I personally fail some challenge that reCAPTCHA offers when I am the one that is trying to submit some info, the service is invaluable to filter common undesired emails.
But fear not, everything you used so far, is ready to handle reCAPTCHA v2 challenges and service.
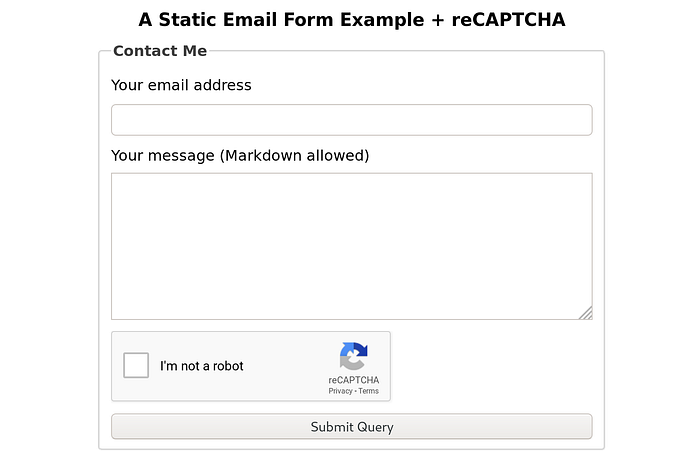
The following is a preview of how our form will look like, after implementing the “I’m not a robot” feature:
reGISTER Your Site
Sign in to reCAPTCHA website, and visit the Admin console.
Click the + icon to Register a new site, in case this is not the first page you find if you’ve never used this service before.
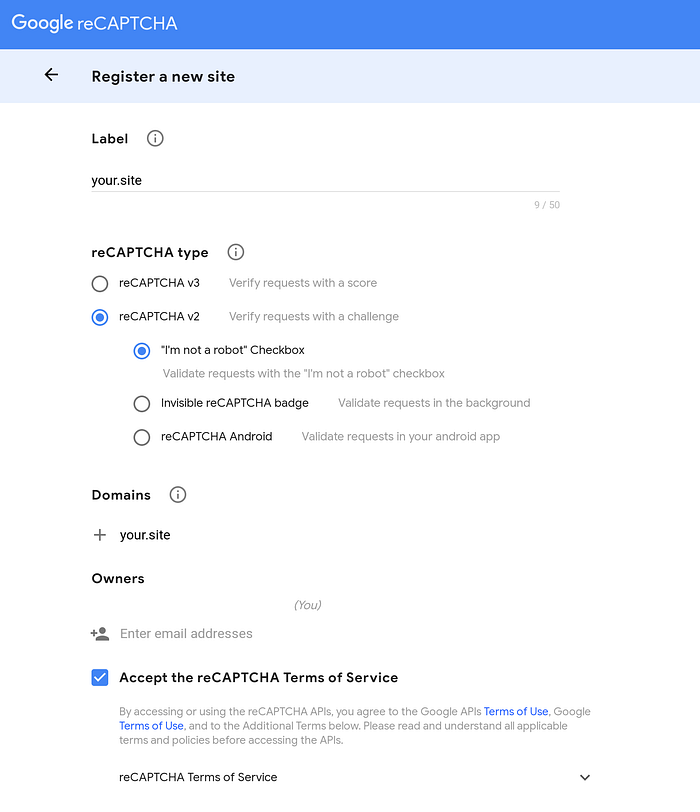
Fill up the fields with your informations, and be sure you select the reCAPTCHA v2 type, and Accept the reCAPTCHA Terms of Service (after reading it).
Your form should look something like this:
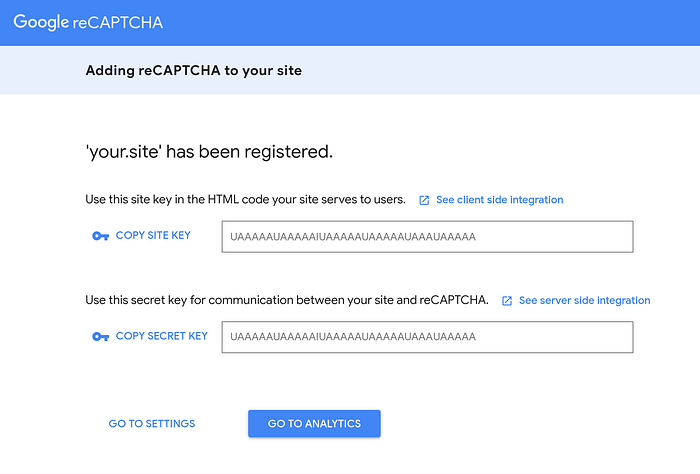
Once you agre and move on, you should see a page that provides you a SITE KEY, and a different SECRET KEY.
Now Add The Secret
Similarly to what we’ve done before, we need to both save the second SECRET KEY to our .env file:
RECAPTCHA_STATIC_EMAIL=yadaYadayAdayaDayadAbut also store it for zeit now:
now secrets add recaptcha_static_email yadaYadayAdayaDayadALast, but not least, we need to update now.json file to bring that key up:
{
  "env": {
    "AWS_SES_TO": "@aws_ses_to",
    "AWS_SES_REGION": "@aws_ses_region",
    "AWS_SES_ACCESS_KEY": "@aws_ses_access_key",
    "AWS_SES_SECRET_KEY": "@aws_ses_secret_key",
    "RECAPTCHA_STATIC_EMAIL": "@recaptcha_static_email"
  }
}
Save .env and now.json and just wait a minute before deploying to prod.
Upgrade The Paperboy 🗞
Not only the secret key needs to be available in production, the static.email.ses module also needs to know it.
require('dotenv').config();const {create} = require('static.email.ses');const {
  AWS_SES_TO: to,
  AWS_SES_REGION: region,
  AWS_SES_ACCESS_KEY: accessKeyId,
  AWS_SES_SECRET_KEY: secretAccessKey,
  // grab the env variable and ...
  RECAPTCHA_STATIC_EMAIL: recaptcha
} = process.env;module.exports = create({
  site: 'static.email',
  sender: 'Static Email',
  to,
  region,
  accessKeyId,
  secretAccessKey,
  // ... pass it along the static.email.sas module
  recaptcha
});
Save those changes in the api/paperboy.js file, and you’re almost done!
Upgrade The Layout
We need to both include the Google script, and find a place to show the challenging checkbox.
This is how your public/index.html should look like now:
Upgrade The JS Setup
We now have everything but the JS to instrument reCAPTCHA.
Following how the new public/js/index.js should look like:
Please note the siteKey part, where the one you need to use, is the one in the first field of the reCAPTCHA page we’ve seen before.
reCONGRATULATIONS 🎈🎉
After updating those few files as suggested, you are ready to now --prod for the last time, and you shuold see the challenge being asked, and the email sent only after reCAPTCHA has validated the result, as it is already for https://static.email/ which demoes live everything you’ve done, and learned, so far. Yes, this is the end of our journey regarding sending emails from a static website, we’re now able to bootstrap many projects at the lowest possible cost.
Please don’t hesitate to write down your feedbacks, and thanks for following me up to this point ♥
P.S. it’s a good time to commit one more time:
git add .
git commit -m 'success 🎉'


